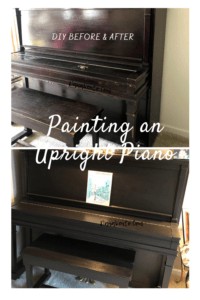
Painting an Upright Piano To Revive Its Look. A DIY Adventure.
Cost: $50
Equipment
- Sanding Paper
- Paint Scraper
- 4" roller
- Tray for Paint
- Blue Tape
- Drop Cloths
Materials
- Zinsser Primer *Optional
- Fine Sanding Paper
- Face Mask
- Paint Brushes 1", 2 1'2 Inch
- Roller for Pain
- Tray for paint
- A hand scraper
- Painter's Tape
- Drop Clothes
- TIME
- Color-Changing Wood Filler Minwax
- Rust-Oleum Metallic Antique Brass 260728 Universal All Surface Spray Paint
- Foil
- Plastic Wrap
- Assorted foam wedge paint brushes 1/2" & 1"
- Minwax Satin 356050000 One Coat Polyurethane Quart
Instructions
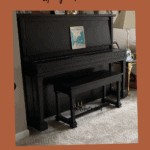
- Before and After You Can Do This!
- Again, read my disclosure about the age of my piano and WHY I did this.
- Not all pianos should be refinished.
- If working inside, or outside place painting floor covers down to catch spills, sanding dust, etc.
For Piano Prep And Bench Prep
- Tape any brass, hinges, exposed areas that are NOT to be painted with painters tape.
- For the Piano keys, take care to not only tape the area but to cover with plastic wrap (I used plastic wrap and carefully tucked around the keys to ensure no paint would touch the keys.
- Don't forget to tape off the key and surrounding area.
- The bench, again tape off the hardware so that you don't paint it over (it may not function well if you do such)
Sanding:
- Because my bench and piano were a mess (stains, knicks, wood missing) I actually LIGHTLY sanded each.
- Enough that if you blew on those surfaces, sanding dust would fly (just to give you an idea).
- Be aware, you will be lightly sanding (if you don't use Zinsser) therefore dust will be in the air.
- You may want to tape off the area with plastic and tape to keep debris limited
- First, lightly sand the entire area using fine sandpaper.
- Next, wipe the sanded areas down.
- Areas must be clean and free of debris before painting.
- *If you are using Zinsser, you may not want to sand, that is fine, I did it both ways, sanding and not. Also, after the Piano Bench, I did not use Zinsser on the Piano. As I said, I changed things up a lot along the way.
Wood Filling
- For any chips and knicks, use a wood filler, to repair such areas.
- Allow the wood filler to dry and then sand it down.
- Yes, I first sanded everything, and then went and filled in the knicks.
- I wanted the edges to be smoother before filling knicks.
- Then, I sanded the filler and wiped it down as well as the surrounding areas.
- No sanding debris should be on surfaces that will be painted.
- The Bench Process.
- First I cleaned the bench.
- I wanted to see exactly what I was working with.
- How many chips, and what repairs were needed?
- Beginning by sanding.
- Then, I wiped it down again.
- Using Zinsser to cover the color.
- One time over as plenty in my mind and I would not do the priming ever again, it was a waste of time on this project, and I quickly came to learn that!
- However, wanting to share my full story, I am disclosing that I tried it and did not like this step, it's not the product, just not a needed step.
- Using a 4" brush and a 2" brush is how I spread the Zinsser.
- I allowed it to dry per the directions on the can.
- Since I originally began working outside on this project, I was able to use the light to see the area I was covering.
The Piano
- For the Piano, I actually used a small 4" foam roller and loved the results.
- I simply painted starting with the bottom and working my way to the top.
- Once it was dry I repeated the process to achieve the color I was looking for.
- However, I did NOT paint the keys or the cover to the keys.
- Key area painting: I painted the cover for the key a day later, as I needed to be able to open it.
- Following ALL painting I then covered it with ONE COAT POLYURETHANE with the windows OPEN.
The Pedals
- These were a mess, so first I washed them.
- Then I sanded the grit gunk off them (you don't have to, I don't like that 'popping' look so I did.
- Next, I covered the surrounding area and painted them.
- Make sure to cover below and around.
- The windows were open again as fumes are strong.
- Once dried I repeated to achieve the look I wanted.
- I do suggest this process BEFORE you paint any other part of the piano AFTER you have sanded the piano itself.
- If you are sanding.
Notes
I don't fix pianos.
Nor am I a Piano Pro.
My Piano was an antique and has some 'sour tones' that can't be fixed, therefore painting it would NOT harm it any further than it was.
However, do not attempt this project unless you are sure you are ok with a possible change in sound.
Dana Vento, All Social media of owned by Dana Vento and DanaVento.Com are not liable for any issues that may result in YOU finishing your piano. I simply published to Share what I did. Painting your piano is at your own risk!
Products listed are what worked best for me, do choose those suitable to your project.