DIY Styrofoam Cooler Snowman That Won't Blow Away
Please note, you will want to use a COOL glue gun for this project. IF you use a High Temp Glue Gun, you will MELT the styrofoam and ruin the project.
Equipment
- Glue Gun
- Scissors
- Paint Brush
- Scissors
Materials
- 3 Styrofoam coolers
- acrylic black paint
- plastic food container 16 oz
- 2 smaller ornaments
- Clear spray sealant if using bulbs
- Ribbon
- Glue Gun low temperature not HIGH Heat
- Glue sticks
- Elmers Craft Clear Glue
- Dirt or Rocks
- black spraypaint exterior
- 2 Same Color Glitter Pipe Cleaners nose, mouth
- Pencil
- 2 pieces matching pipe cleaners trim for hat
- optional black paint for belly button
- Ribbon for scarf
- Sticks for arms
Instructions
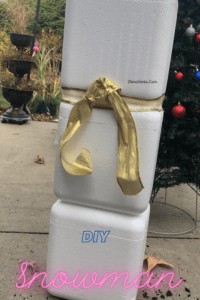
- First Open three styrofoam coolers.
- Next, fill each one with DIRT of Rocks to weight it down.
- Once filled as far as possible with still allowing the lid to attach stop filling.
- Now, using your glue gun and some clear glue (to assure the lid will stay attached) trim the rim with glue and place lid on.
- Next. Place one cooler in front of you.
- Using clear glue (for crafts like Elmer's) and your glue gun place glue across the entire lid.
- Now, place the 2nd cooler atop the first and press a bit.
- Repeat this same process to affix the 3rd cooler.
- While these are setting up with the glue, I suggest placing something heavy atop the three coolers for about 10 minutes.
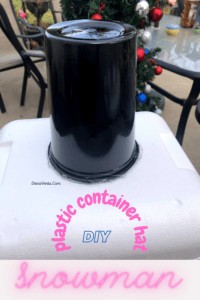
- Now, take the plastic 16 oz container, and let's go paint the tophat.
- Don't overcoat it, just enough to take it from clear to black
- Next, take the 2 ornaments and spray them with a clear sealant. (don't overspray, just enough to coat and protect)
- While the tophat and ornaments are drying, it's time to get back to the snowman details.
- Now, I suggest starting with a scarf.
- Since I was using any scrap ribbon I had laying around, I first made a wrap from the front to the back.
- Once you trial fit it, then attach with hot glue.
- Then, I formed a bow in some way ( I am not good with bow making) and attached this with glue also.
- Next, the tophat dried quickly, so I worked on centering it atop the snowman's head.
- Using my glue gun, I followed the rim of the plastic container and then attached the hat to the top of the snowman.
- Next, since there was glue around the base, I used this to my advantage and added a sparkly pipe cleaner to make it show a bit better.
- Then, a few sparkly balls and a branch.
- I worked on the eyes and mouth and nose last.
- First I worked on the eyes.
- Using scissors I cut a little slit where I wanted each eye to go.

- This way, when I coated the tip of the ornament hanging portion with glue it would stick better and be 'in' the styrofoam.
- After attaching both eyes, move to the nose, so you can center it.
- I took one sparkly pipe cleaner and wrapped it around a pencil, making it 'spring-like' and dimensional.
- Again, I slit the styrofoam with the scissors, placed glue on the end of the nose, and pushed it into the container. ( I suggest using tweezers, as I should have to really get it in there and not STICK to your fingers).
- Last I worked on the mouth.
- Simply gluing the pipe cleaner to the width I chose and attached.
- Then, just like that, the DIY styrofoam cooler snowman is done!
- OF course, you can add arms, if you like I stopped short of the arms to make it easier to store!
- Enjoy! ~ Dana XO