How To Craft A Shabby Chic Tabletop Christmas Tree.
Yield: 1 Shabby Chic Tabletop Christmas Tree
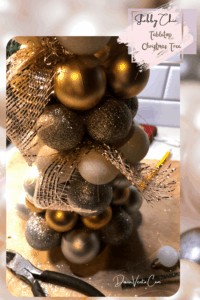
Materials
- Dowel Rod 36" Cut to 2 Feet
- Metallic Bow With Wire rose gold, or your choice
- 1 " Ornaments- 2" ornaments Mixed 58 TotaL silver, pearl, gold, rose gold, sparkle silver, and sparkle rose gold
- Mini Ornaments 12 pack $1
- Glue Gun
- Glue
- Scissors
- 1 Large 2-3" bulb *top
- Styro Base 1/2 circle at dollar stores
Instructions
- Place cut dowel rod with a drop of hot glue into the styrofoam base directly in middle.
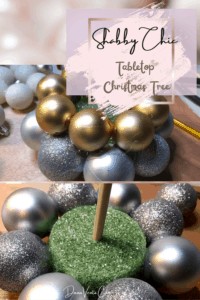
- Next, begin with 8 large ornaments, lining color as you choose around the base.
- Using the ornament top, push into the styrofoam.
- Pull back out and apply hot glue then push back in and hold to set.
- Repeat the process for the other 7 bulbs on this row.
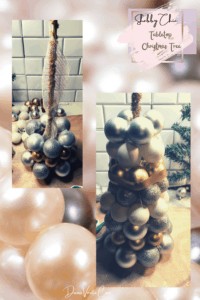
- Next change to 6 bulbs either all solid colors or mixing depending on the look you want to style.

- Stack these setting on the edge of the others more towards the outside of the tree.
- Glue one at a time and make sure to GLUE in between as well.
- Space and arrange once glued and still not set.
- Repeat onto the next layer.
- Before moving on, I suggest dressing the dowel rod, you may see it, so use an iridescent bow and lightly yet tightly affix to the dowel with glue and then move on.
- I even added a few sparkle pipe cleaner, but I should have just done all bow, it's easier
- Now, Then move to create 3 rows of 5 bulbs.
- Play with the setup to make it all even and rounded out.
- You want to be thinning the tree as you move up, just like a real tree, you are working to a point
- Next 2-3 rows of (4 bulbs ) depending on the size you used below.
- If you used 1" bulbs you will be creating 3 rows, if you used larger bulbs you will have just 2 rows of 4.
- Then a row of 3 and 2 bulbs until you are at the top.
- Affix the largest bulb you have to the top of the rod with glue.
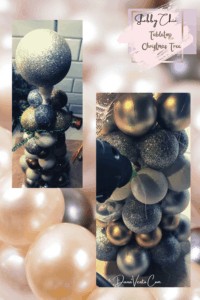
- Then fill beneath it to fill it in with vase filler ornaments.
- Once you are done with the bulbs, it is time to fill the between the bulbs.
- Simply cut the wide iridescent bow into a 4" strip.
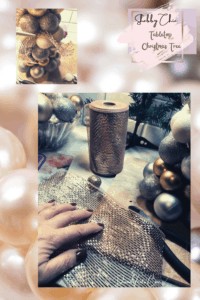
- Cut that in half again, now you have 2 pieces.
- Take one piece and twist it a bit, like you are making a bow.
- In the center, apply some hot glue and press it between any open spot on the tree.
- Repeat this over and over until the tree looks like iridescent burlap is filling any open cavities without OVERDOING it.
- Don't forget to also cover the base (styrofoam with a bit of the iridescent bow as well, just using enough hot glue to coat without over-doing or letting it drip on the base or it won't stand straight.
- Let this all set up for about an hour and then you can gift and use it immediately.