Super Easy DIY Elf Holiday Wall Decor
It's important to realize ahead of time that this will be a gift that more than one person will want.To put it differently, plan that notion out ahead of time, and make enough to give. Be prepared. Additionally, these are also great for nursing home gifting, as well as office spaces. Couple all this with the fact that you can double the size or hang more than one in a row and you've got a very versatile project. ~ Dana XO Mine cost me next to nothing to create because had these items around the house. You might find a cost of up to $5 if you make this.
Yield: 1 Wall art
Cost: $5-6
Equipment
- See above
Materials
- Poplar Wood Strips 1/4" x 2 1/2" of 21" (you may have to buy 2 pieces and glue or one longer one and cut.
- Burlap - 22" x 2 1/2" (cut to fit your wood strip top to bottom.
- Glue Gun
- Glue
- Scissors
- 3 Elves measuring no more than 9" x 2 1/2" wide
- Bow with Wire
- Drill
- Hook for Hanging
Instructions
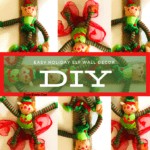
- Before you start, lay this out and see where each elf belongs.
- You want to be certain to start with one elf Upside down with dangling feet, one elf right side up(middle elf), and the last upside down and fully on the wood.
- First, glue your burlap to the piece of wood.
ELF 1- Upside Down With Dangling Feet
- Next, turn one elf over and glue from the top of the hat and to its waist.
- This elf will be upside down.
- Glue this elf towards the top of the burlap, upside down allowing its feet to dangle just a bit. (1" or so).
ELF 2 - Right Side Up
- Next, turn the next elf on its back and glue it from the top of the hat, through the body, to the feet, but not the arms.
- Equally important is matching the elf up.
- At the same time, do make sure that the heads align as photo'd above.
- As a result, it will look like the image above, Elf 1 with Elf 2, head to head.
ELF 3 - Upside Down, Crossed Legs. No Dangle
- Turn over the last elf, glue him from feet to the hat, do not let him hang off of the board.
- Don't glue his arms.
- Glue him with his hat at the end of the board and then accent him by crossing his legs.
- Drill a hole in the back of the wood, to match your hook size.
- Add a bow.
- Place the top elves' foot inside the bow loops.
- Hang.
- Enjoy.
- Make Extras